I was super excited that Lizzy entered! She has an adorable little blog full of fun things! Like most of the rest of us, she loves beauty products! And she has simply gorgeous hair!! I'm also thrilled with what she chose to write about! I've tried knitting (okay, tried and succeeded! Everyone in my family got a scarf last Christmas lol) but I haven't tried crocheting yet! I may just try this pattern that she has to share with us!
Soooo without further ado, I'd like you to all welcome LIZZY!!!!!:) (and after you read her post, go follow her blog!)
Hi everyone! My Name is Lizzy and I'm a newbie to the blogging world. I won this guest post from Kristen at GlitterGlossandGlaze's
on her 100 Follower Contest. I typically blog about my current beauty
subscriptions, or reviews of products I've been sent complimentary for
testing purposes. I enjoy sharing my knowledge of anything beauty or
freebie (or both combined) related.
I
chose this DIY Crochet post because it is something a lot of people
have asked for, and its quite simple for a beginner at crochet to
follow. If you would like to
learn how to make a stylish chunky/slouchy beanie, then keep reading!
After posting a video response to TraceyBeauty's "DIY: Chunky/Souchy Beret"
on Youtube, I've had many people ask for the written pattern (via
YouTube) and Tracey said It was perfectly fine to post this, so here it
is!I apologize for the delay, this has been quite the challenge as I
have never written a pattern before.
I
also apologize in advance for the pattern itself.
(wording, abbreviations) I wrote this pattern in the best way I could.
It may be off in terminology or format but If you're one
of the viewers who've been really wanting this pattern to be written, I
feel this will do it justice.
Slouchy Beannie Pattern:
Supplies:
1 Skein of Worsted Weight Yarn
Size J Crochet Hook
Yarn Needle
Scissors
1Wooden Bead (optional)
1 Small Crochet Hook (small enough to fit through your bead)
Abbreviations:
CH: Chain
Sl St: Slip Stich
SC: Single Crochet
DC: Double Crochet
BPDC: Back Post Double Crochet
FPDC: Front Post Double Crochet
* Repeat For the Entire
Round
1. Ch 60
2. Sl St into the very first chain to create a circle.
3. Ch 3, (Count as a DC here and throughout)
4.
DC into each stitch for the rest of row, keeping in mine to not allow
the circle to twist. To connect the current row, Sl St into the top of
the very first DC.
(This is where you connect your row/circle)
And this i what it will look once it is connected
5.
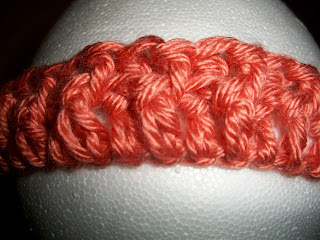
Ch 3, *FPDC into the first stitch, BPDC into the second stitch* To
connect the current row, Sl St into the top of the very first DC
This is what the band of the hat will start look like.
6. Repeat step 5, four more times
This finishes the band.
7. Ch 3, *1 DC into the first stitch, 2 DC into the next stitch* Sl St to connect the current row
Where the hook is pointing, is the stitch you will DC into
This is what the finished row will look like
8. Repeat step 7, two more times
9. Ch 3, *1 Dc into each stitch* Sl St to connect the current row
This is what step 8 & 9 will look like when finished
10. Ch 3, *1 DC into every other stitch* Sl St to connect the current row
This is what Step 10 will look like when finished
11. Ch 3, *skip two stiches, 1 DC into the the third stitch* Sl St to connect the current row
Tho hook is pointing at the 3rd stitch in which you need to
DC into
12. Repeat Step 11 one more time.
This is Step 11 finished
13. 1 SC into every other stitch until you have no where left to go.
Keep going! You're almost there!
14. This step is for the optional bead. Cut off your yarn with about 3- 4 inches.
Insert your bead through a smaller hook
Grab the yarn through the hook
Tie the yarn around the bead twice
Slip the two ends through the hat
Tie about two-three times ensure its strong enough to hold.
And there you have it, a finished slouchy beannie!
If
you have any questions regarding this hat, please feel free to comment!
I understand how frustrating it can be when you're still learning.
Special Thanks to Kristen for allowing me to guest post and helping me with my button for my blog!!
xoxo
mattabellax3


