Showing posts with label tips. Show all posts

Friday, October 12, 2012

Flashback Friday: Glitter Removal Revisited

Hi Lovelies! Can you believe I've been blogging here for almost a full year?? Omg, it seems crazy to me! What started on a whim as a "new hobby" has developed into so much more! But enough reminicsing for now, more for another post. But today for Flashback Friday, I wanted to flashback to a previous post! This was actually from my Q&A series and was originally posted last December; however, I still get questions all the time of how I remove glitter polishes! So, without further ado, here is what I shared with you all last year:

Today's question comes from on of my dearest friends @DivaMommyTweets who is documenting her first pregnancy at "A Mommy in the Making" blog If you haven't seen it yet, you should totally check it out! We are just days away from finding out the sex of her baby! (I'm thinking BOY but we will hae to wait and see!!)

So on to the Q&A!

Q: I have such a hard time removing glitter polishes. I'll usually just rub polish remover on them and buff the rest out. Do you have a better way to do it?

A: Thanks so much for your question, Diva, I must say that glitter polishes are some of my favorites!! I love small glitter, big glitter, silver glitter, colored glitter--love love love all of it! Unfortunately, it is a pain to remove. This is in no way my secret tip, I found it from reading stuff online; but I can vouch for it and say that it totally works! *drumroll please* The foil method!! To do this, you'll need at least five cotton balls (one for each finger and thumb of one had. You can use ten, or just re-use the five for the other hand:), strips of aluminum foil, and nail polish remover (I use 100% Acetone, because I don't mess around with removal;). Get each cotton ball saturated with the acetone and set on the nail. Then wrap a piece of foil around the finger and ball. It's easier to do one hand at a time. Wait for just a few minutes (like the time of a commercial break if you're watching TV) then unwrap the foil, slide off the cotton ball (with a little pressure on the nail) and Ta-Da! Glitter removed!!! I've done this twice now, and it works like a dream! No more scrubbing my nails, no more picking pieces off, just a good clean swipe! The process looks kinda sillly, but it definitely works.


Now how about everyone else? What are your secrets to removing glitter? Have you tried the foil method? Did it work for you? Does it need to be foil? Can you wrap the cotton balls in saran wrap or something else? Does it need to be cotton balls or would cotton pads work, too? Let me know what you think!

Tuesday, June 5, 2012

Guest Post: Arielle's Interview Outfit Tips

Hey Lovelies!! I'm sooo super excited about today's post! Arielle is one of my favorite blogger friends, and after her guest post last time, I just could not wait to have her write again! Of course, she was too busy planning her super secret getaway wedding;) But she's back now (and married:) and was kind enough to share this post with us today!

Hello Glitter, Gloss and Glaze readers!
It's Arielle from Beauty by Arielle! You may remember me from the blog swap Kristen and I did in February. You can see those posts here and here.

A little about me-I am a 20 something product junkie from Illinois. I can't think of a time since I was a preteen that I wasn't obsessed with makeup and beauty products! My blog is devoted to all things beauty related. I feature product reviews, hauls, tutorials, tips, fashion and health.

Today I will be blogging about dressing for an interview on a budget!

A couple of months ago I had an interview for my first "big girl" job in my field. It was nerve wracking to choose what to wear. 
Let's face it-in this economy we cannot afford to spend 1,000's on interview outfits but we want to look pulled together to land that job! So how did I handle the challenge?

I began by googling how to dress for an interview. I thought some tips from the pros would put me ahead. 
Here are the tips I thought were wins and followed myself:
  • You can never be too conservative. If you are going to show skin do one or the other (legs or arms) but do not do both.
  • Show some personality but not too much personality. A pop of color is the best way to do this or with a conservative print. Steer clear of neons, red or animal prints. A suit is always nice but is not necessary. 
  • Wear minimal, simple accessories. Make sure nothing clunks together because it will be distracting.
  • Closed toed pumps are a must.
  • Take a simple bag that doubles as a brief case to carry extra resumés, writing samples, letters of recommendation, etc.
  • Make sure your hair is neat and in place.
  • Manicure your nails in french, natural or a neutral, light color.
  • Keep your makeup natural.
  • Do not wear perfume.
When in doubt, look up or call the company for their dress code policy. Even if you know the company dresses casual on a daily basis, dress up for your interview. I once heard a principal say they were interviewing for a gym teacher position and the interviewee showed up in a track suit because she was "dressing for the job." Needless to say, she was not hired and the principal was completely unimpressed.

Next, I raided my closet for items that would fit into the "rules". I did not have the time or funds to run out for new clothing. Thankfully, I keep some basics on hand at all times. I found a LBD, a blue cardigan and some simple accessories. I wore the cardigan over the LBD, buttoned up completely, with a belt at my waist. My closet items were all steals because my LBD was from the clearance rack at Target, my sweater was thrifted from Plato's Closet, shoes were thrifted from ebay and the belt was from another top!

Here are some similar items, all from Target (except for the belt), which are all easy on the wallet: 


After several agonizing weeks, I received a call for a second interview. The catch? They wanted me there in the next 36 hours. This time, I truly had no idea what I could pull from in my closet. I ended up finding a printed blouse at Kohl's for $7. I paired it with a pencil skirt I already owned and the accessories from the previous interview outfit. By doing it this way, I was not blowing cash on a whole new outfit. I tucked the shirt into the skirt for a more polished look.

Here are some similar choices, again from Target:

 
You could also combine both outfits and do something like this:

Combination of Interview Outfits

Here the LDB is used as a skirt and cinched in with the belt.
Let's say you do not have items in your closet to pull from. My suggestion? Raid the clearance racks and thrift wisely. All of my items were either thrifted or from the clearance rack. Everything I wore was less than $60. Choose outfits where you can reuse accessories. This will also save you some moolah! It is also helpful to keep basics on hand so that you only have to pick up one or two new items.

By the way, I did land the job!

Thank you Kristen for allowing me to guest post today!

Thanks again, Arielle! You are welcome to post here any time you want!:)

If you enjoy Arielle as much as I do, make sure to check out her blog and some of the other places she can be found:
Facebook
Pinterest
YouTube
Bloglovin
HelloCotton
And! If you ever forget how to find her blog; I can pretty much promise her button will always be in my sidebar so she is just a click away!:)

Monday, February 13, 2012

Guest Post: Beauty by Arielle's Hair Tips

I have something special for you all! Arielle of Beauty by Arielle and I are doing a blog swap today! She's posting for me here, and I'm writing over at her blog. Make sure you check it out:) 
xoxo, Kristen

I want to thank Kristen for participating in this blog swap with me today! I am very excited to share this post on hair washing with all of you!
We all wash our hair on a daily basis and have done so for years, so why do we need tips on it? Good question. I thought I for sure had this beauty ritual down. Wrong

About a year ago I was listening to Cosmo Radio and they had a guest who was talking about hair care tips. What I discovered was that there is the wrong way to shampoo your hair!

WRONG!
The only area shampoo should be lathered into is the scalp not throughout all of the hair. When you rinse there will be enough shampoo to run down the rest of your hair and effectively clean the rest. Shampooing all of your hair will dry out the ends.

The amount of shampoo is important as well. For longer hair, the size of a quarter is enough. As the length decreases so should the shampoo amount. 
This  is a great tip I learned from a hairstylist. When you use the same shampoo day to day and week to week it tends to build up in your hair. Switching shampoos on a weekly basis will prevent this build up from happening. For example, week 1 use favorite shampoo 1 on week 2 use favorite shampoo 2. Then, switch back and forth. The stylist pointed out that this tactic is especially good for color treated hair. 

A shampoo I like to use are the John Frieda Brilliant color lines:


I think this line is especially great for color treated hair! 
On to conditioner...again there is a wrong way to do this! The same hair guru on Cosmo Radio said to never condition your scalp.

WRONG!
image via Recipes for Life
Conditioning the roots will only weigh your hair down. The only strands that need conditioning are from the point where you would make a low ponytail to the ends. Also, leave conditioner on for a minute before rinsing so it can penetrate into the follicles. 

To keep your hair hydrated one to two times a week use a deep conditioner. I love L'oréal EverPure Deep Restorative Masque:
image via Real Beauty

When I bleached my hair, I'm a brunette, I used this conditioner twice a week and it left my locks nice and soft. This conditioner is safe for color treated hair and the rosemary mint smells fantastic! 
Do you have any hair tips you swear by?

Arielle is the author and creator of Beauty by Arielle. You can find her blog here. Her blog is devoted to all things beauty related. She features product reviews, hauls, tutorials, tips, fitness, fashion and food. Arielle also hosts a monthly guest blogger series. If you wish to participate you can e-mail her at beautybyarielle@gmail.com . You can also follow her via Google Friend Connect by clicking here.

Monday, December 19, 2011

Hair Care--My Favorite Products!

Okay, so I'd been doing really well sticking to my schedule! I had a whole post typed up for Friday, but it just seemed to whiny so I didn't post it (Fridays are "free Fridays" where basically I write about whatever I'm thinking regardless if it's beauty related or not:)

So today is Monday! As you recall last week I talked about products I enjoyed using to wash and condition my hair. Today is all about styling products!

Let's start with a few disclaimers--just because these products work on my hair does not necessarily mean it will work for yours--everyone has their own special unique hair type:) Also, I am a completely no-nonsense hairstyle kind of girl. I'm not a morning person, so a lot of the time, I'm into wash and go and I want products that work for that.

Without further ado, let's jump right in!

As mentioned before, I have wavy hair that seems to frizz.. a lot. So the first product I'm loving right now is the Garnier Fructis Anti-Frizz Serum. I love this a lot because it's very light, it doesn't leave any sticky residue in my hair, it smells great, and it calms the frizz--not completely, but it definitely helps control it. Also, a little goes a long way; basically one pump of the liquid and I'm good to go!

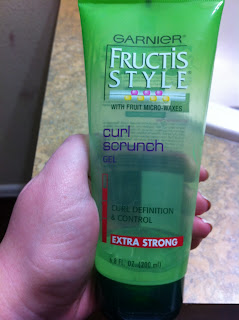
After putting the anti-frizz serum in, I use another Garnier Fructis product--Curl Scrunch! I squeeze some into my palm, rub my hands together, flip my head over and scrunch the product throughtout all my hair. Flip head back up, put a little more in and good to go! If I have the time, I will blow dry with a diffuser and continue to scrunch 'til dry! That yields a look like this:

Now, as easy as wearing it wavy is, there are times I want it to be straight. I have different products for that:)

Still trying to avoid the frizz, I use Aussie's Anti-Frizz Cream. This is a cream vice a serum so it's a little bit heavier than the Garnier Fructis that I use. Since it's heavier, it would pull the waves down; but wearing it straight, the heavier cream helps it lay flat. When the cream dries, it does have a little bit of a crunch to it which can be felt, but doesn't look like it too much (I hate that look like when you have too much hairspray that the hair looks hard--almost like a Ken doll lol). One or two pumps is enough for my whole head, then I used a wide toothed comb to equally distribute it throughout the hair.

Then! It's time to spray in a protectant! John Frieda's Frizz-Ease Heat-Defeat Protective Styling Spray is the one i've been using lately--not saying it's the best, but I've been pleased with it so far. It is very important to use a heat protectant any time you're going to be using heat with your hair (blow dryers, straighteners, curlers, etc.) remember, the less damage you put on your hair the less it will frizz!!:) 

Once it's protected, I blowdry and straighten! But, that is another post for next week when I'll share with you the tools I use!!

What are some of your favorite products? Do you prefer wearing your hair wavy/curly or straight?


LinkWithin

Related Posts Plugin for WordPress, Blogger...