Showing posts with label sinful colors. Show all posts

Wednesday, December 19, 2012

Winter Wonderland Nails

Hi Lovelies! Can you believe it's less than a week to Christmas!! It's especially hard for me to believe since it's still 80 degrees here during the day! I do love Florida, but I'm missing a little wintery weather. So! I've decided to make it snow on my nails!

I posted this picture to Instagram/Facebook/Twitter the other night and people seemed to really enjoy it, so I wanted to share with you how I did it!

First, this is a shirt that I got at Target probably four or five years ago--it is one of my favorite T-shirts that can really only be worn during the Christmas/winter season (because who wears snowflakes other times of the year??;) [sadly, thanks to the baby in my belly, I can't wear it this year:(]
This was the inspiration for my nails! I'm not sure why blue seems like such a "cold" color, but it does hahah!
First, is my favorite base coat!

Then two coats of Sinful Colors Cinderella--this is a really soft, baby blue, with light sparkle to it (one of my faves) and a coat of China Glaze Luxe and Lush from the Hunger Games. This polish has some chunky sparkles in that are multi-colored and kinda change color depending on the lighting.
With my Konad white polish and stamping set, I used Shany plate 17 which has a big snowflake right in the middle of it and tried to center the snowflake on each nail.

Once it dried, I used another coat of Luxe and Lush (this helped add additional dimension to my nails so it really looks like how snowflakes glisten in the sunlight when they fall:) And finished with Seche Vite top coat.
Sadly, I waited 'til late at night to take additional pictures and didn't use the flash so the quality isn't as good as I'd like and it definitely doesn't show just how amazing my nails look! So take this for now, and I'm going to try to get better (outside!) pix soon to post more!!

So what do you think? What special manis have you done for the holidays??:)


Sunday, July 15, 2012

Nail Challenge Week 28: Gradient Nails

Hi Lovelies! I've gotta tell you this was by far one of my favorite challenges so far... and it was one I was most nervous of! I cannot even begin to count alllll the times I've tried gradient nails before. I had Googled tutorials; I'd ready blogs; I'd watched YouTube videos... but no matter what I did, I just couldn't get them to look like everyone else's... as of last summer, I swore I'd never do it again.

That was, until it came up on this week's nail challenge. I knew I had to do it! I could not fail at a nail challenge! So I started doing more research again...

I'd pinned this picture to my I heart my nails board a few weeks ago, and this was my inspiration:
via
So here's how it started... I had Sinful Colors Snow Me White, OPI Kiss My Tulips, and Sally Hansen Xtreme Wear Sunkissed.
After one coat of the Snow Me White, I got a triangle makeup sponge and cut it down so it was about the same size as my finger nails so I could get ready for the next step!
So I had a piece of wax paper and I put the pink polish on top and the orange polish right below. A little thick so that it would not be completely absorbed onto the sponge but would be able to put on my nail (this was a big mistake I'd done in the past--I was painting directly onto the sponge and I never got it thick enough so it wouldn't go onto my nails just right)
Once it's on the sponge, I just "sponge painted" the nail. A little dabbing, a little blending. Then re-drip some polish on the wax paper for each nail so that I'd have a full coverage on all of them.
Ta-da! I only did one coat of the sponging, but you could probably do more if you wanted to make it darker or more intense. I just used a Q-tip dipped in nail polish remover to clean up the excess polish that ended up around my finger from the sponging.
Top coat and done! I absolutely love how this turned out! I started looking at other polishes and thinking of all the other gradients I want to try! I know it seems like a lot of steps, but I promise it's actually super simple and I know you all could do it!:)

Have you tried gradient nails before? What method do you use?


Wednesday, July 4, 2012

Nail Challenge Week 27: 4th of July Nails

Happy Independence Day to all my American Lovelies! I've gotta tell you, I love all of you dears in the UK, but I am forever grateful that we broke away from you in 1776! I heart the USA and everything about 4th of July! I love love love fireworks and festivals and all the fun stuff that comes about celebrating our independence! You know when Wal-mart and Target sell their specialty 4th of July shirts? I buy them every year. I know, I know, how many do I really need, right?? Like I can really only wear them one day a year! lol.

Anyway, I love how red, white, and blue look together. You may remember my flag nails that I did last month for Flag Day...

...and last year 4th of July I did these nails (keep in mind this was before my blog and nail challenge even came about)

So for 4th of July this year, I wanted to do something different. Something fun. Something festive! Something like FIREWORKS!!!!
Sinful Colors GoGo Girl, Sinful Colors Snow Me White, Wet 'n Wild Your Fly's Down
I started painting each nail with a different color in order: white, red, blue, white, red, blue.. etc:)
After that, I used a red glitter, a white glitter, and a blue glitter to make them all sparkle like the fireworks in the sky!
OPI A Sparkle Yule Love, China Glaze Full Spectrum, Sinful Colors Hottie

Yay!! I think this is definitely a great look! It was super easy so not time consuming at all! I might wear this anytime I just want to feel like a true American;)

What did you do for your 4th of July nails? Any big plans for the holiday??:)


Wednesday, June 20, 2012

Nail Challenge Week 25: Rainbow/Pride Nails

Another week and another challenge! I've got to tell you, one of my favorite things about these nail challenges is how open they are for interpretation. Like some of the past ones stripes, floral, dots, etc. it can be ANYTHING. And you can have 5 people doing the challenge and you'll have 5 different manis! I don't just mean the colors, like completely different styles!

This week's challenge is Rainbow/Pride nails. I figured a lot of people would do rainbows on each nail or possibly a different color of the rainbow on each nail--pretty straight forward right?

I, however, decided to go a slightly different route... I wanted something fun and festive but not *too* out there. I wanted to have the rainbow on my nails, but without my hands looking like clowns.

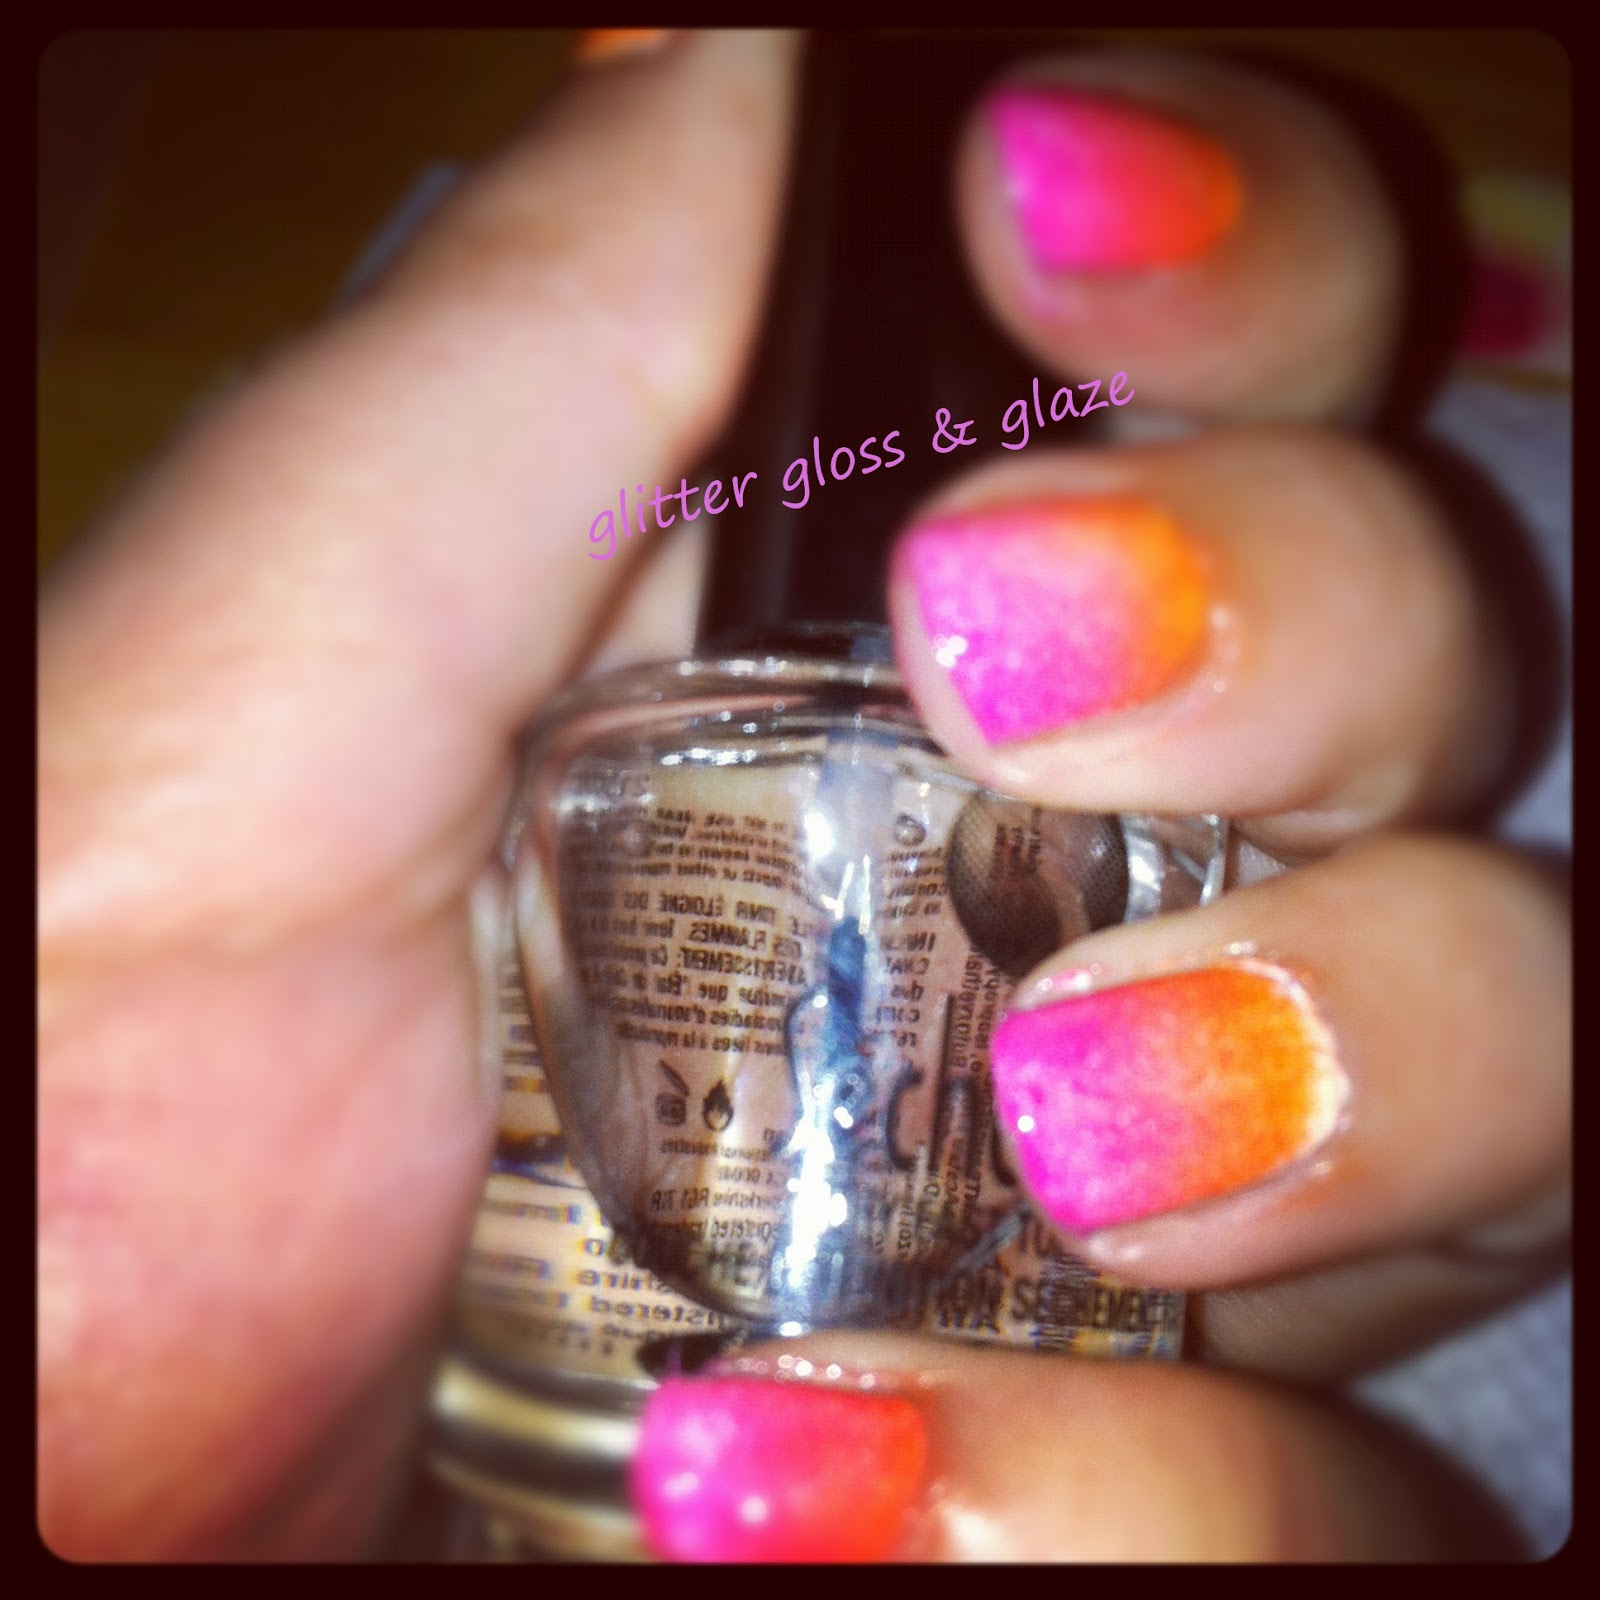
So here is what I did. After my usual OPI Base Coat, I used two coats of Revlon's Sheer Cotton. This is a fun color because it's kind of nude/neutral (at least for pale people like me;) but it's also got enough color in it that you can still tell my nails are polished.
Then, I picked out the rainbow from my collection. In order ROYGBIV. (did anybody else learn that acronym for learning the colors of the rainbow? Is it just an American thing?) Red Orange Yellow Green Blue Indigo Violet--ROY G. BIV. lol
Sinful Colors Go Go Girl, Sinful Colors Cloud 9, Sinful Colors Innocent, Essie Mojito Madness (thank you Klout!;), Teal (not sure what brand this is; funny story, this is the ONLY polish I have had since high school. I believe I came in a set of four and some of the polishes were scented!), and Revlon Grape.

And this, my friends, is what I did:


So it may not be easy to see, but what I did was put all the colors along the tips of my nails--French style--and the colors change from red to orange.. orange to yellow... yellow to green.. green to blue... then blue/indigo/violet ended up on my thumb. lol. Just like a little pop of color!

What do you think? How would you do rainbow nails?

Thursday, June 14, 2012

Nail Challenge Week 24: Flag Nails

Ladies and Gentlemen of the USA ~ Happy Flag Day!!!! In honor of today's day (Thank you, Betsy Ross for designing an awesome flag), I have American Flags on my nails! This actually wasn't my first time doing flag nails... last 4th of July I attempted them as well.
Insert Star-Spangled Banner music here.... lol


So, how did they get to that point? Well, after OPI Base Coat, I did two coats of Sinful Colors GoGo Girl (still my favorite red polish to date).
Once it dried, I used CoverGirl Blue You (which, p.s. I got for $.25 at a yard sale;) to do the top corners over the red. I used two coats of this also to make sure the red was completely covered.
Even the colors just like this look pretty fun;) But after MORE dry time, then it was time to do the stars and stripes! I used my Sally Hansen Nail Art pen in Pearly White (it's too bad I accidentally picked that one up a couple months ago. I think plain white would've had more dramatic lines)
And finally! I used my Migi Nail art pens (yay!) I couldn't draw whole stars, so I just made dots (which honestly, if you're looking at a flag in the distance, don't they kinda look like dots??;)
There you have it! Hope you have a simply amazing flag day!! Even if you aren't an American;) What other flags would be fun to put on your nails? Canadian? Australian? Italian? :)


Sunday, June 3, 2012

Nail Challenge Week 22: Splatter Mani

Hi Lovelies! Time to see another one of my nail challenges! I know there are a couple different ways to do this.. you can either take a small brush and literally splatter the paint on your nails or you can use straws to kinda blow the paint on to your nails.

I chose the straw method.

I did a base coat and two coats of Sinful Colors Snow Me White then taped around my nails. I'm usually really bad at this, but I think I'm using a better thinner tape that actually worked out quite well!

For my splatter, I wanted to do it kinda old school. Did anyone ever have their school pictures taken on the latter in front of the splatter paint background? It was all primary colors and just kinda crazy. That's really the splattered look I was going for.

I used an empty Birchbox cover and dripped in the polishes (Revlon Top Speed Fast Dry Nail Enamel Jelly, Sinful Colors Unicorn, and Orly Snowcone), used a straw for each color (two from Ruby Tuesday's, one from Wendy's) and blew each color.

I did one nail at a time. So like, pinky got red.. blue.. yellow... next nail...

This is how it turned out (still with tape on so it looks super messy):


Then after taking the tape off there were really just a few spots that would require some extra clean up:
Confession: I only did my left hand then took it off. I wear a lot of crazy things on my nails to work; this just seemed a little *too* messy for me. I like the splatter mani for the right occasion; but for me, I just couldn't rock it as an every day nail look.

Have you done a splatter mani? Which method do you prefer?


Thursday, May 24, 2012

Nail Challenge Week 21: Fruit Mani

Strawberries! Bananas! Pineapple! Kiwi! Cantaloupe! What do all these words have in common?? They are some of my favorite fruits! (ooh peaches and plums too!!:) I was both excited and nervous about this week's challenge! A fruit mani. *sigh* As with all of these challenges, it could go sooo many different ways! As usual, for inspiration, I checked out Google. So many girls did so many fabulous designs on their nails! I considered doing a variety of fruit--almost like little fruit baskets on my hands! But that was just sooo much work...

So, I cheated. Again. And I know stamping isn't really *cheating* but it still kinda feels like the easy way out. Hahah.

Thank you Shany for making a plate with a strawberry on it!:) lol

My plan was actually to make it look like the strawberries had been drawn on and colored in on my nails. In my head, my inspiration was the Dooney and Bourke bags that looked like they'd been doodled on
via
So two coats of ORLY Opal Hope... p.s. how beautiful is this color??? I love that it's soft and shiny and changes colors in different lights. When applied by itself, it doesn't totally go with my skin tones, but for this, I think it was perfect! After that, I kinda did some red blotches with Sinful Colors GoGo Girl (still my fave shade of red right now!!;). Then stamping with Konad Special Black.


Someone at work pointed out they look like lady bugs... and I think they kinda do, but they're STRAWBERRIES!!:) Yay!:)

What's your fruit? What fruits would you have put on your nails??:)

Sunday, May 20, 2012

Nail Challenge Week 20: Bow Mani

Hi Lovelies! I promise I actually did this mani  last week when it was time; I just haven't gotten around to posting it 'til now!

So this (well last, lol) week's challenge was for a bow mani. Bows! That could be almost anything! Hairbows, bowtie, rainbows... etc. I knew I'd be able to draw bows on my left hand nails with my right hand, but I was really doubting my left hand skills to do my right hand nails lol. Soooo I went to my ever faithful stamp book to see if I had any bow stamps!

I was in luck! Yay! So after a base coat and two coats of Sinful Colors Pink Cream, I did a quick stamping on each finger with my Shany Plate and Konad polish. For a little extra spin on it, I finished with Hard Candy's Matte top coat!

Now, the matte gave it a fun and unique feel (I'm really starting to like more polishes matte now! It's unexpected:) but I noticed it really faded/made the stamping polish run/disappear a bit. It was kinda weird... But anyway, here is the finished product!


And there it is! After I did the first hand stamp across the tips, I decided to do it more angled on my other hand. If I used this stamp again, I think I'd do it diagonal. It's just a fun look--almost lacy-like!

So have you done a bow mani? What kind of bows would you have done?

LinkWithin

Related Posts Plugin for WordPress, Blogger...